
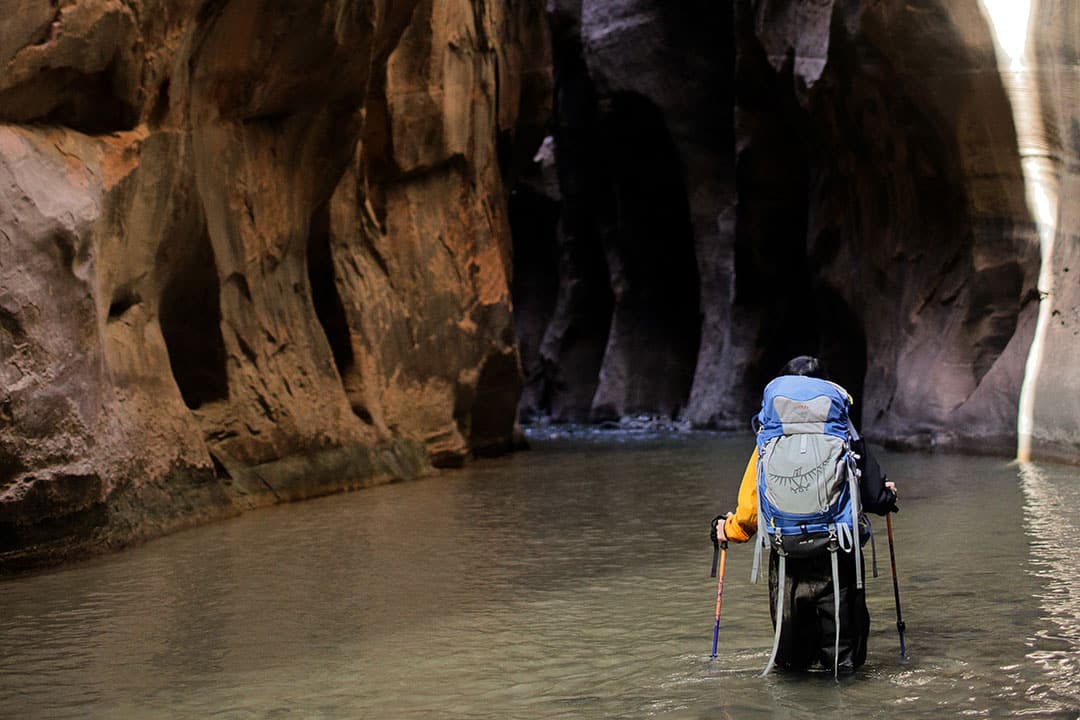
Since I’ve had a handful of people ask me for tips for preparing for the Narrows hike, this post is for you!
There are two hikes you can do for the Narrows at Zion National Park:
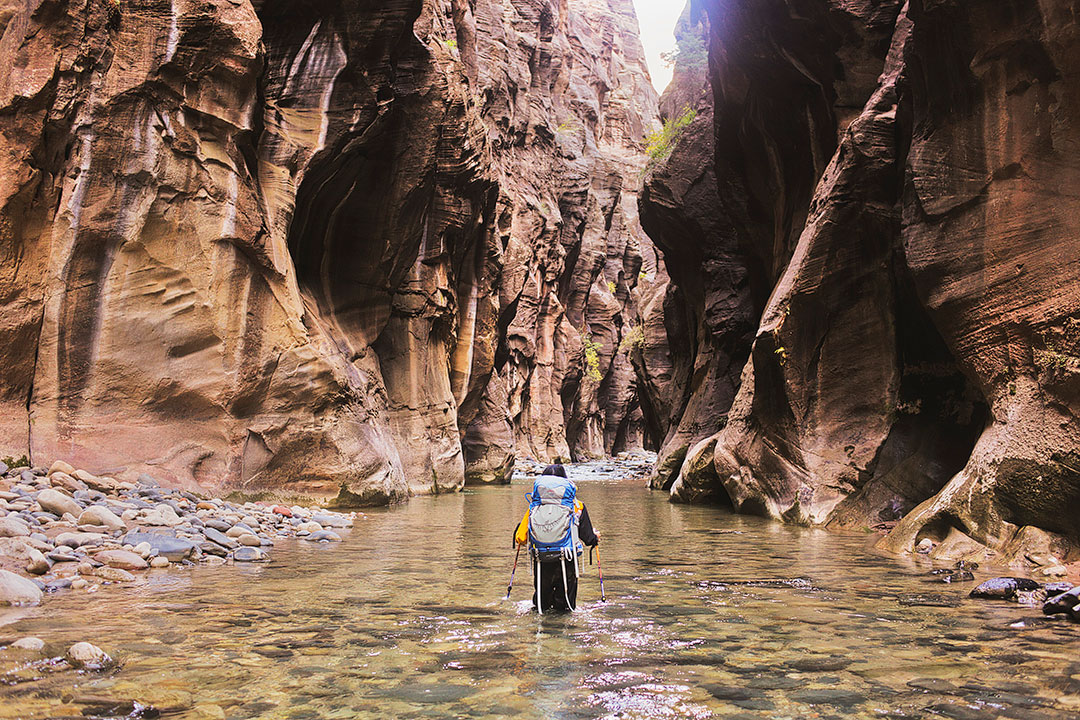
- The top-down thru-hike starts at Chamberlain’s Ranch and ends at the Temple of Sinawava, the two entry points into the river. It’s a two day 16 mile hike with 1,189 ft (361 m) elevation change.
- The bottom-up hike is a day hike starting at the Temple of Sinawava to as far as Big Springs. It’s essentially the bottom half of the Narrows.
We did the top-down during the fall, and the packing list covers everything you need, but I will also leave some tips near the end of the post for what you need on the bottom-up day-hike.
This post may contain affiliate links, where we receive a small commission on sales of the products that are linked at no additional cost to you. All opinions are always our own. Read our full disclosure for more info. Thank you for supporting the brands that make Local Adventurer possible.
Last Updated: June 21, 2023
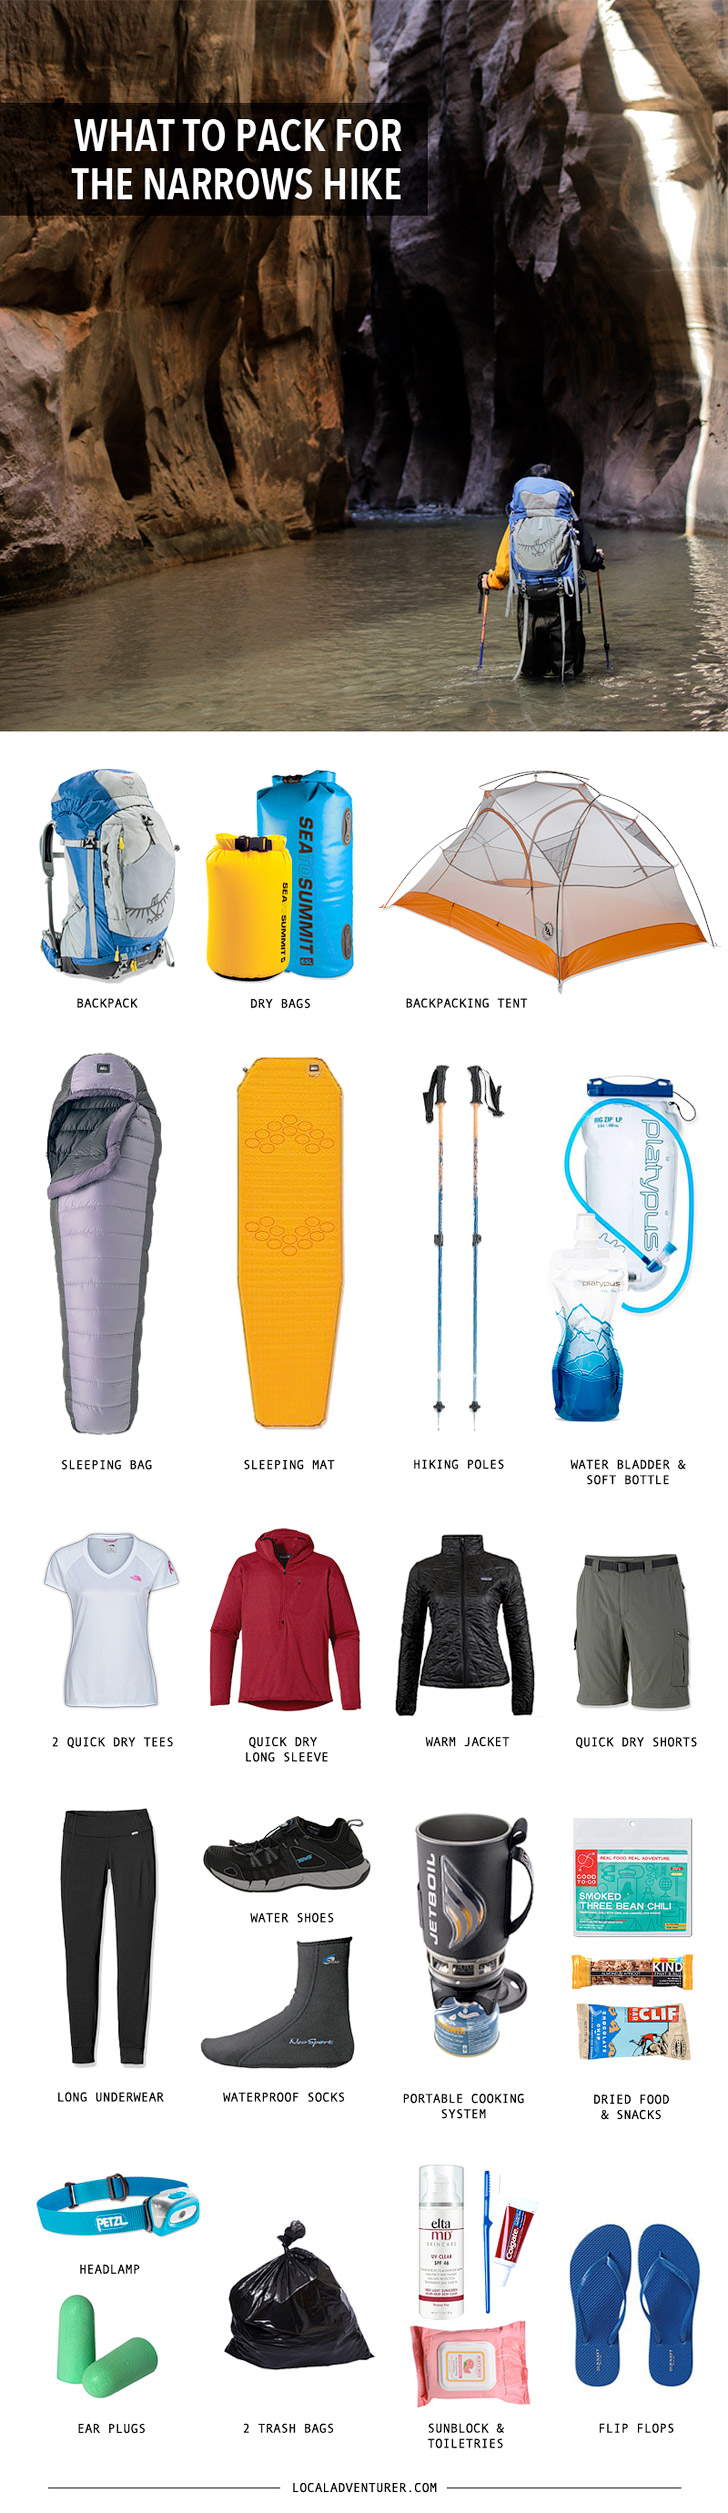
Backpacking Gear List for the Zion Narrows Hike Top Down
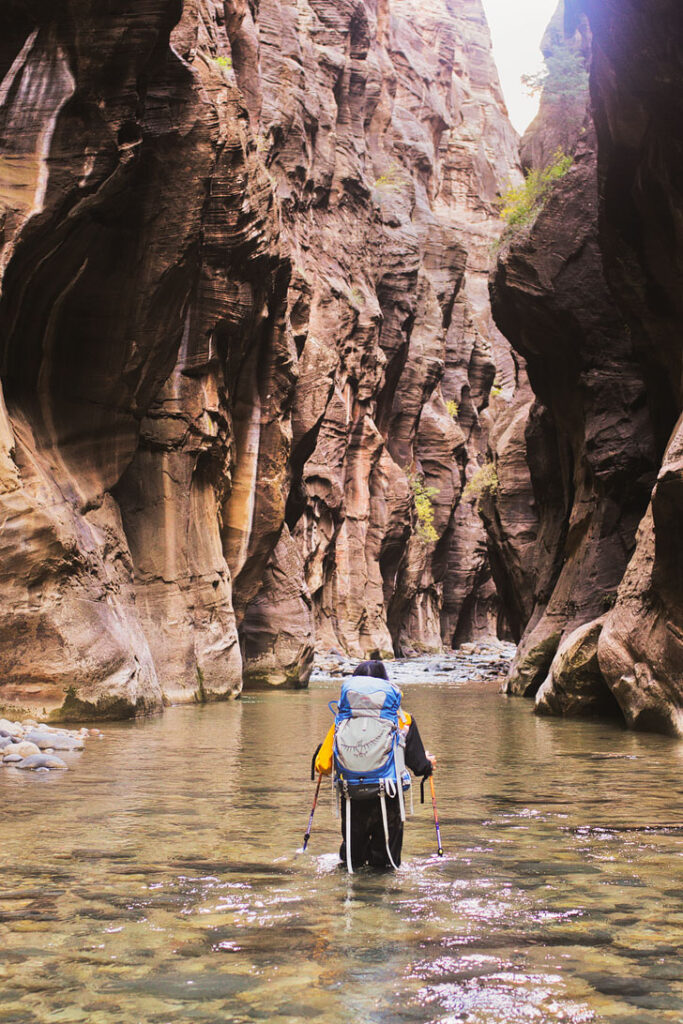
- Backpack: We used our Osprey packs. This is the one I use this the women’s one is too big, and this is the one Jacob uses. We ordered a couple of full-on waterproof bags, but we’ve found they don’t have very good support to carry a lot of weight.
- Dry Sacks / Bags: We each used one large and one small (4 total).
- Backpacking Tent: Our backpacking tent is one of the best and packs down to 5.5 x 17.5 inches (14 x 44.5 cm) and weighs 3 lbs 2 oz. Whichever tent you decide on, it’s really important that it’s light and compact as possible. Some people forego having a tent altogether and sleep outside since you can’t backpack the Narrows if it rains anyways. I might be a little more high maintenance, but I prefer not being covered in dew when I wake up. ;)
- Sleeping Bag: We both have REI sleeping bags. Pay attention to the temperature rating, weight, and compressed volume. You want warmer, lighter, and smaller.
- Sleeping Pad: We have lightweight sleeping pads, which packs small and is light. These are also optional, and our friends with us toughed it out, but we did get better sleep. :)
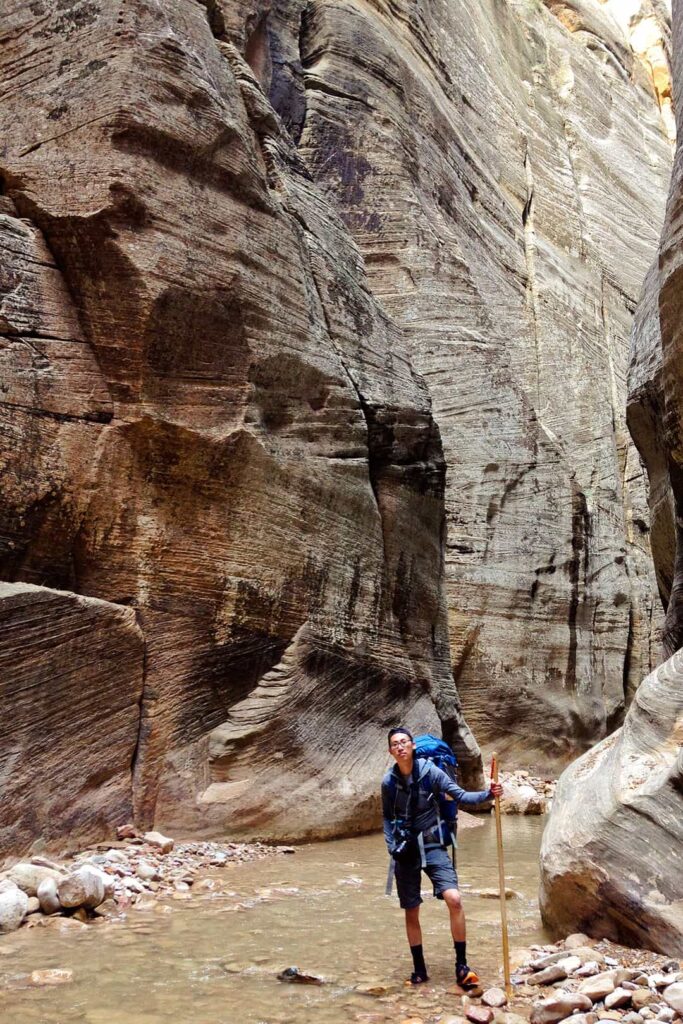
- Walking Poles: We have these trekking poles. They recommend that you rent walking sticks because yours might get dented up in the water, but mine did just fine. I think it also helped to have two for balance when navigating through the rapids.
- Water Bladder: We both have platypus bladders and filled it 2 liters to last us both days. We didn’t sweat much since it was fall. You can bring less and also bring a filter (see water filter tips below).
- Collapsible Soft Bottle: I brought the 0.5L soft bottle to mix in Emergen-C just in case I got sick. See all the best travel water bottles here.
- Quick Dry Tees: I brought two of these, one for each day. I personally like to use the second clean shirt to sleep and then hike the next day in it, but if you don’t mind wearing the same shirt twice, go for it! Jacob brought a regular cotton tee the first day, but we don’t recommend cotton, because it doesn’t dry and doesn’t keep you warm. Luckily, his shirt only got wet near the end of day 1’s hike, so he didn’t have to stay wet long. The second day he just wore the quick-dry long sleeves.
- Quick Dry Long Sleeves: I brought one and Jacob brought two. We always bring our Patagonia base layers. Ideally, wear two quick-dry layers: one tee and a long sleeve over.
- Down Jacket: It gets really cold early mornings and after dark. We both brought our down jackets, because they are really warm and also very compact. We also like to use these as pillows.
- Quick Dry Shorts: Jacob wore these hiking pants both days, and I wore these both days. Dry your shorts on a tree overnight, and they’re good to go. We both left the zip offs at home. Our friends brought swim shorts.
- Long Underwear: We both have the patagonia midweight bottoms to keep us warm at night. Jacob just happened to forget his on this trip and got really cold.
- Water shoes: Jacob has these, and I ended up renting shoes that had great ankle support but much heavier and slowed me down. I also own keen water sandals (kid’s of course. it’s purple and sparkly :P), but our guy friends with similar water sandals kept getting rocks in theirs during the hike, so Jacob’s shoes win.
- Waterproof Socks: Jacob used these, and I used the rental socks. We were both disappointed that they held in so much water. We were sloshing around even when we were on dry land.
- Portable Cooking System: We use a jetboil to cook so that we can have some warm food while hiking. You can also forego this and take a bunch of bars, but since the water is cold, we decided it’d be nice to have warm food.
- Dry Food and Snack Bars: We brought Mountain House Lasagna, Cliff bars and Kind bars for me (6-8 each) and didn’t stop for lunches. We also brought 2 stingers per person.
- Headlamp: We both have these petzls and they always help if you are stuck setting up your tent after dark or if you need to use the bathroom.
- Earplugs: If you’re a light sleeper and you have snorers in your group, you’re going to need these. The river can be loud.
- Sunblock: There really isn’t much sun, but it’s good to stay protected so we brought this sunblock
- Toiletries: Toothbrush, toothpaste, wet wipes, emergen-C just in case I get sick.
- Trash Bags: To double bag your dry sacks. No dry sack is 100% waterproof. And more bags to carry your poop bag and trash. 3 total since Jacob is such a great husband and carried out both our trash and poop bags, but bring 2 for yourself if you’re on your own. ;)
- Flip Flops: We both forgot these and it was a HUUUUGE mistake. After settling into our campsite and changing into dry clothes for the night, we still had to put on our wet shoes. It was miserable. Bring really cheap ones, I don’t care, but do NOT forget them!
- Poop kit / bag (not pictured): They give you one per person when you arrive at the Zion Welcome Center to pick up your permit.
- Camera gear (not pictured): We brought a tripod, a Mark III with a 35/1.4L lens. It’s really heavy and probably not the safest since I don’t have any waterproof gear for it. We were just extra careful to make sure we didn’t fall into the water, and if we did, we saved the camera instead of ourselves. Half the time it was tucked away in my smaller dry sack.
- Sunhat (not pictured): I have this Columbia hat, but it was more of a nuisance because it kept hitting the top of my backpack and falling off my head. A regular baseball cap was more effective. Also, the first day we barely got any sun. The second day was a little more exposed, but you’re going in and out of shade constantly.
See More: 15 Incredible Things to Do in Zion National Park Utah

Car Camping
The first night we decided to bring all our car camping gear so that we can get a good night’s sleep before our hike. It was nice because we could leave all of it in the car during our hike days. We have since changed our car camping set up, and you can see our car camping essentials here.
For Car Camping the night before and / or after:
- Car Camping Tent: We have this Coleman 4 person tent, a cheap tent that fits our mattress.
- Inflatable Mattress: We used this queen-sized mattress and blew it up using our car.
Additional Tips
- Reservations: Make them up to 3 months in advance here.
- Permits:
- Permit Costs: $15 for 1-2 people; $20 for 3-7 people; $25 for 8-12 people
- Walk-In Permits can be obtained one day in advance from the visitor centers.
- Hiking in Summer: The only thing I would change for the packing list for the summer is more water (about 4 L a person) and you can leave behind a warm jacket. The water is still cold.
- Day Hike Only: We recommend bringing water shoes, waterproof socks, 1L of water, snacks, and some comfortable clothes. We saw that most people stopped at Wall Street and turned back.
- Lodging: We drove straight home after we got back from day 2 of our hike, so that we could have a warm shower and rest in our beds. The day before the hike, however, we went in and stayed at Watchman Campgrounds. It is a great campground with exceptionally clean bathroom facilities. They don’t have many campgrounds available at Zion, so you should try to book reservations early. We showed up and they happened to fit us into the overflow group camping area.
- Shuttle: There is a shuttle service provided by Zion Adventure Company that takes you to the trailhead at Chamberlain’s Ranch. It is $37 a person. We took the shuttle to the trailhead of the hike. It’s a pretty rough road, so our friend’s forester would have been fine, but our Altima might have struggled a bit. Also, it would have added an extra hour and half or so of driving on the last day.
- Renting Dry Pants and Suits: I rented a whole set with a dry suit, waterproof socks, water boots, and a hiking stick because the company who provided the shuttle service recommended everyone to wear at least the dry pants when the water temperature drops below 55 degrees F (12.7 deg C). It was at the end of peak season where the temperature was 55 degrees F. They also told me I was too short and needed a dry suit because the water levels would go above my waist and my dry pants. In hindsight, I would go without any of the rental gear. All the guys did fine and the cold water wasn’t unbearable. Meanwhile, I was burning up in my suit, so I had the top part off and the sleeves tied around my waist most of the time.
- Filtering Water: If you want to carry less water on your back, you can bring a water filter for after Deep Creek Junction / the campsites. It’s not recommended to filter and drink the water north of it, because there are cattle farms.
- Number of People: The top-down hike had a total of 10 people on the day we went. The first day, you feel like you have the Narrows all to yourself. The second day is the part where most people hike the bottom half on a day hike bottom up. While there will breaks in between groups of people, you definitely have to wait for photos.
- Water Levels: When we arrived, they told us the water level will go up to waist deep (for average height people) and chest-deep for me. The first day of the hike (top half) was roughly 80% ankle deep. The second day (bottom half) was roughly 75% ankle to knee-deep. I expected there to be longer portions of deeper water where I’m possibly swimming, but there were only 2 or 3 deep portions that were unavoidable and at most two steps in length. If you use your walking sticks to measure the depth of the water, you can easily navigate around a lot of the deeper waters. Also, clear to light green water is shallow, while darker blues / greens mean deeper water.
- Time it Took: The map and the landmarks given to us didn’t seem very accurate. Day 1 was supposed to be a shorter day. We expected it to take less time, which felt demoralizing near the end. It’s all about setting expectations, right? The second day, we breezed through it.
- Riverside Walk: After you reach the Temple of Sinawava, there is still one more mile of hiking on the paved trail to the shuttle.
- Cut Your Toenails! I ended up slicing the sides of my toes.
- Makeshift Toilet: Squatting and pooping in a bag can be a challenge especially after your legs are jello from the hike. The last thing you want to do is fall into your own poop. :) The second day, the guys created a makeshift bathroom with two rocks on both sides of the bag for you to rest your butt on.
Best Places to Stay in Zion
Planning Checklist
- Get comprehensive insurance for your trip.
- Download these helpful language apps.
- Find a great deal on Zion hotels.
- Arrange a rental car for your trip.
- Book a tour for your visit.
- Buy a travel charger to keep your devices charged.
- Get a new backpack for your trip.
- Buy a Zion travel guide.
- Pack the appropriate shoes for your trip.
- Don’t forget your in-flight essentials.
What’s in your backpacking gear list? What’s the toughest hike you’ve been on?
Did you enjoy this post? Pin it for later
SEE MORE NATIONAL PARK GUIDES
⟡⟡⟡⟡⟡
“Discovery consists not of seeking new lands but in seeing with new eyes” – M. Proust
Esther + Jacob
Esther and Jacob are the founders of Local Adventurer, one of the top 5 travel blogs in the US. They believe that adventure can be found near and far and hope to inspire others to explore locally. They explore a new city in depth every year and currently base themselves in Las Vegas.
Follow on Instagram (E + J), YouTube, TikTok, and Pinterest.
